Learn How To Use Node-Fetch NPM To Make HTTP Requests In Node.js
Sorin-Gabriel Marica on Dec 07 2022
Making HTTP Requests is one of the most important features of any modern programming language. Node.js is no exception to this rule, but until now this feature was in the hands of way too many npm packages that are out there. Node-Fetch offers an alternative to this, by using the original fetch API that is currently supported by most of the browsers out there.
Introduction to Node-Fetch API
Before I start telling you about the Node-Fetch API, I must give you a brief information about what is an HTTP Request. An HTTP Request's purpose is to retrieve information from urls all over the internet. A simple example of an HTTP Request is accessing a website.
While long ago, HTTP Requests were done using XMLHttpRequest or XHR Objects, nowadays all modern browsers support the Fetch API from javascript. This allows programmers to make the requests with a much simpler and cleaner syntax. However the fetch API was missing for a long time from the Node.JS server side language, leaving room for other custom made packages to take care of this feature, such as: Axios, GOT and many others.
Node-Fetch is the equal of the Fetch API from javascript, and now it's finally available in Node.JS as well.
Prerequisites for using Node-Fetch API
First of all since this is a Node.JS tutorial, you will need of course to have Node.JS installed. If you don’t have it already, you can download and install it from this link.
Node.js has released experimental support for the Fetch API only starting with the version 17.5. So you will need to have at least the Node 17.5 version. Also you will need to use the –experimental-fetch flag when running your scripts.
If you have a lower version of Node.JS, to jump to the latest version you can use the n package. N is a npmjs package with the sole purpose of allowing you to switch between node and npm versions. To install it and switch to the latest version, follow these steps:
npm install -g n
n latest
The n latest command will install the latest version of Node.js. To verify your Node.js version simply run this command:
node –version
How to use Node-Fetch
Making an HTTP Request in any programming language is an asynchronous operation, since receiving the response from the request will take time. There are two approaches when it comes to how you can use asynchronous operations. You can either decide to wait for the response and then continue with your code, or run your code in parallel.
Node-Fetch supports both synchronous and asynchronous function calls.
GET Requests in Node-Fetch
To make a simple get request and extract the body from the response you can use the piece of code bellow:
fetch('https://www.webscrapingapi.com/')

    .then((response) => response.text())

    .then((body) => {

        console.log(body);

    });
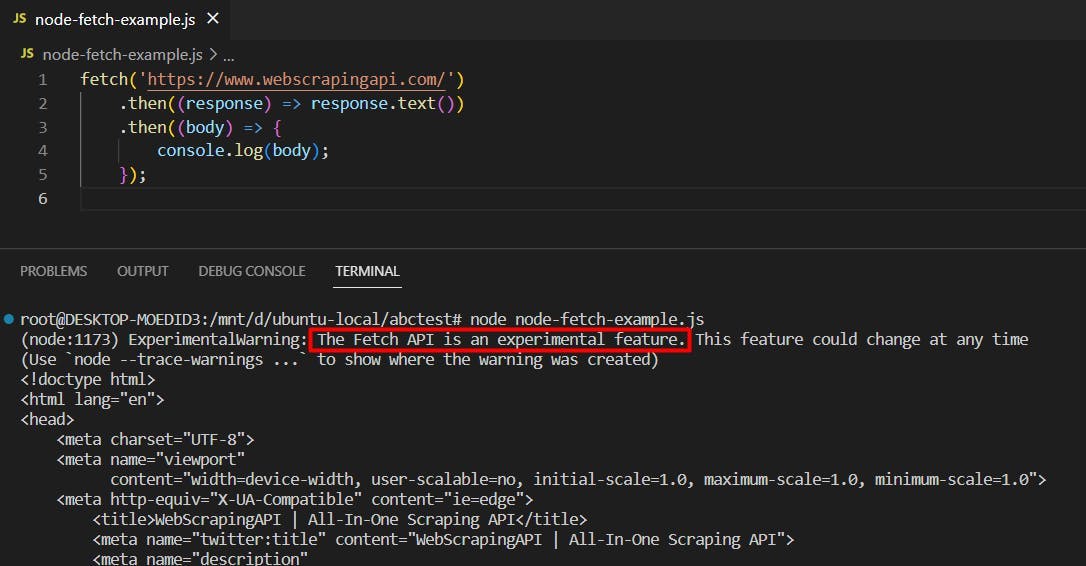
To run this code you should save it in a file called node-fetch-example.js and run it from the same folder using this command: node --experimental-fetch node-fetch-example.js. Note that when running it, you will get a warning saying that “The Fetch API is an experimental feature”. This is normal since this is an experimental feature at the time of writing this article.

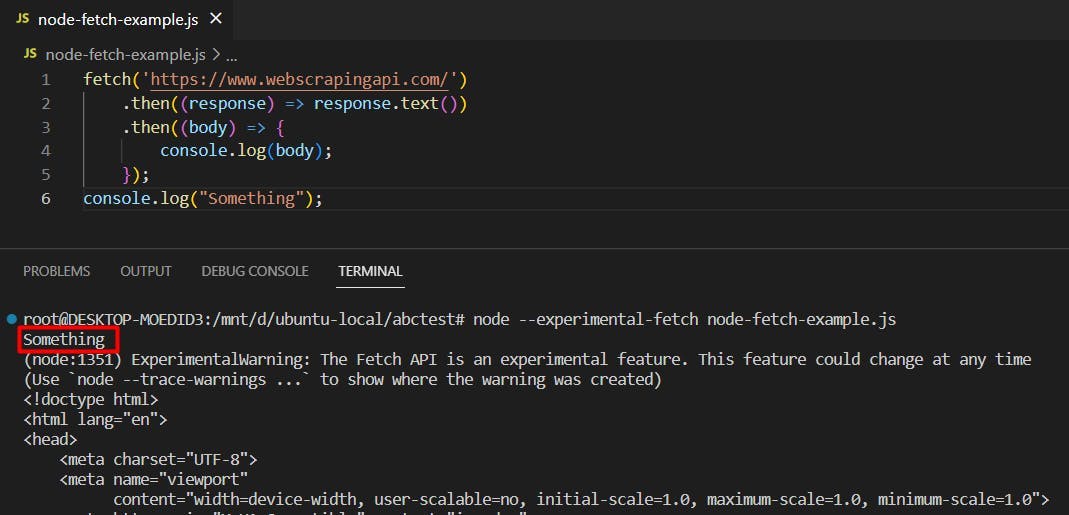
The previous piece of code does not wait for the request to finish before continuing its execution. This means that any code below this one will start executing immediately, without waiting for the fetch to finish. For example if you would add a console.log(“Something”); below the code, when executing the script the output will look like this:

To further explain the code from above, you may notice that we use the “then” function twice. The first “then” will execute when we receive a response from the HTTP Request, and what it does is to map that response with the contents from the response.text() method (which returns the body of the response). But, the response.text() method is asynchronous as well, and thus we need to wait for its response in the second “then”, where body is the equal of the response.text() promise’s result.
You can also call the fetch API using await like we do in the following example:
(async () => {

    const response = await fetch('https://webscrapingapi.com');

    const body = await response.text();

    console.log(body);

})();
This gives an even better explanation on how the fetch API works and what are the promises that you need to wait for. Further in this article we will use the fetch api with await, as this allows us to keep a cleaner syntax for the code.
Sending Headers to the request
Another feature you will need when sending requests is to be able to set the headers of the request you’re making. To do that you may add the headers in the second parameter of the fetch API, like this:
(async () => {

    const response = await fetch('http://httpbin.org/headers', {

        headers: {

            'my-custom-header': 'my-header-value'

        }

    });

    const body = await response.text();

    console.log(body);

})();
Along with the headers there are a lot more options that you may send in the second parameter of the fetch API. To see them all check the documentation of the fetch API (the one used client side).
POST Requests in Node-Fetch
Another important option from the fetch API is the method option. This specifies the method you’re using for the HTTP Request. There are 5 methods you can use: GET, POST, PUT, PATCH and DELETE, but out of them, the first two are the ones most commonly used (GET and POST). By default if no method is specified, Node-Fetch will use GET.
To make a POST request using Node-Fetch you can use this code snippet:
(async () => {

    const response = await fetch('http://httpbin.org/post', {

        method: 'POST',

        body: JSON.stringify({

            'key': 'value'

        })

    });

    const body = await response.text();

    console.log(body);

})();
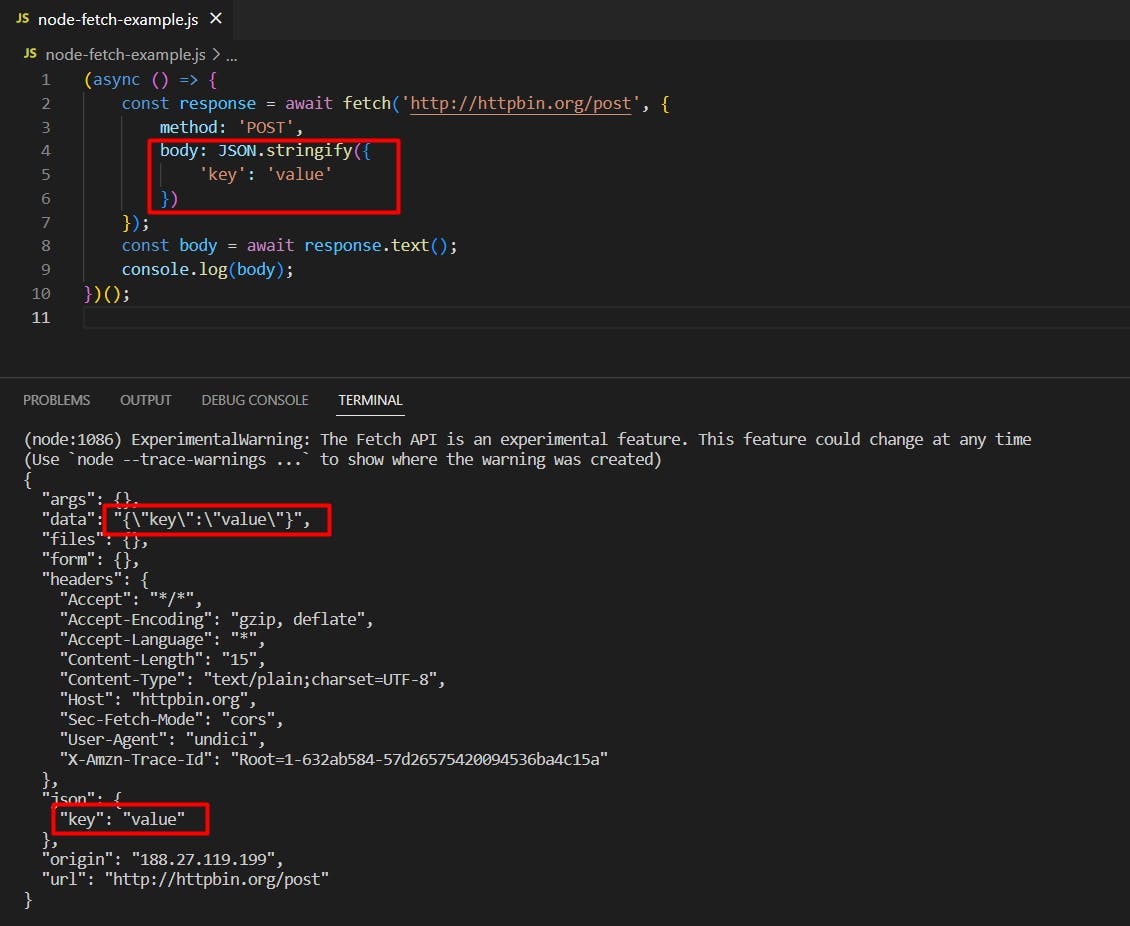
What you may notice here is that we use JSON.stringify to send the body of the request. This is because the fetch api sends the body as a string instead of an object, like other packages such as axios do.
The fetch API covers all the other request methods as well.
Error handling in Node-Fetch
Handling errors when making HTTP requests is a must, since you can never count on a third party service to be always available. As a best practice you should always handle errors, to prevent your app or script from going down alongside the url that you’re making the request to.
Error handling in node-fetch can be done by surrounding the code with a simple try catch syntax. Here is a sample on how to do that when using await:
(async () => {

    try {

        const response = await fetch('[INVALID_URL]');

        const responseBody = await response.text();

    } catch (error) {

        console.log(error.message);

    }

})();
If you prefer to use fetch without await instead, then you can add a catch to your code like this:
fetch('[INVALID_URL]')

    .then((response) => response.text())

    .then((body) => {

        console.log(body);

    })

    .catch((error) => {

        console.log(error.message);

    });
Use cases for Node-Fetch
Making HTTP Requests can be useful in many ways as it allows getting new information from different services and extracting data in quite an elegant and easy manner. There are a few use cases for this that we will explore in the following paragraphs.
Use Node-Fetch for API requests

When programming, oftentimes you may need to use an API. The reason for this is that you may need to get specific data from a different backend source, and then process it or update it. A good example here would be an API with 4 endpoints that allows you to create, read, update and delete users (CRUD operations) in a backend database from another server.
Oftentimes, such an API would need authentication to prevent unauthorized sources from using it and changing the data to their advantage. HTTP Requests have many methods for authentication. One of the most common ones is using an API Key, where the API provider gives you a key that only you should know, and the endpoints of the API work only when sending the correct key.
Another method an API may be protected through, is Basic Authentication. This means that to access the API you will need to send a header with a base64 encoded string of the format “username:password”. Here’s an example of how you may use basic authentication in a POST request:
(async () => {

    const response = await fetch('http://httpbin.org/post', {

        method: 'POST',

        headers: {

            "Authorization": `Basic ${btoa('login:password')}`

        },

        body: JSON.stringify({

            'key': 'value'

        })

    });

    const body = await response.text();

    console.log(body);

})();
Use Node-Fetch for Web Scraping
Web Scraping is a way of getting content from websites and parsing it, so that you keep only the needed data, which you may use as you wish. A good npmjs library that you can use to make the parsing of the data easier is cheerio. This library allows you to query static html, once obtained from the fetch api, the same way as you would query it from javascript or jquery.
Here’s an example of how to get the title of a page using the fetch API and cheerio:
const cheerio = require("cheerio");

(async () => {

    const response = await fetch('https://www.webscrapingapi.com/');

    const responseBody = await response.text();

    const $ = cheerio.load(responseBody);

    console.log($('title').first().text());

})();
The example above should return “WebScrapingAPI | All-In-One Scraping API” as this is the title of the page (the text written on top of the window in your browser). To break it down, we use fetch to get the HTML page source from https://www.webscrapingapi.com/ and we use cheerio to parse that content. To find out more about cheerio you can check out their documentation from here
Scraping information from other websites can be useful in many ways. For example scraped information can be used to create a training dataset for a machine learning model or to create a price comparison tool that extracts data from many sources and then compares it.
While the example above works fine, the fetch api may not always be the best option when it comes to scraping. That is because modern websites nowadays display their content through javascript and use captchas or other methods to prevent their data from being scraped. The fetch API works as a simple CURL to the given url and it retrieves the static content that the page displays when it’s loaded, without any javascript rendering at all.
To scrape data while also executing the javascript code on the page you may want to look into alternatives such as puppeteer, as described in this article about advanced scraping. If you don’t want to go through this whole trouble however, you can use WebScrapingAPI, an API made especially for this task, that takes care of all these problems (including antibot detections) and it comes with a free trial with all the features included.
Summary
To summarize, the good news is that the long awaited fetch api is finally available in node.js even though for now it’s only in its experimental feature stage (at the time of writing this article). While making requests in node.js was possible before, the only way to do them was through either the XMLHttpRequest/XHR objects or one of the many packages out there such as Axios or GOT.
This change will make client side javascript and server side nodejs more alike, since this feature was already available and supported by all modern browsers on the client side javascript.
Making HTTP requests can be useful in many ways, such as using an API or scraping data from a website. While the other npm packages will remain an option and will continue to be used on legacy projects, using fetch is the best solution for the future. This will improve nodejs code readability and it will make the switch from frontend to backend even easier.
News and updates
Stay up-to-date with the latest web scraping guides and news by subscribing to our newsletter.
We care about the protection of your data. Read our Privacy Policy.

Related articles

Learn how to use proxies with node-fetch, a popular JavaScript HTTP client, to build web scrapers. Understand how proxies work in web scraping, integrate proxies with node-fetch, and build a web scraper with proxy support.


Gain a competitive edge in real estate with expert web scraping techniques. Learn how to extract valuable data from Realtor.com like a pro and stay ahead of the game.


Scrape Booking.com for data on hotels and rentals with Puppeteer. Our tutorial teaches data extraction and web scraping, unlocking insights on pricing, ratings, and more.
