Web Scraping with JavaScript and Node.Js
Robert Sfichi on Jan 16 2023
Let’s be honest. From here on out, the Internet’s data volume will only get bigger and bigger. There’s really nothing we can do about it. This is where Web Scrapers come into the picture.
In the following article, we will show you how to build your own Web Scraper using JavaScript as the main programming language.
Understanding Web Scraping with JavaScript
A web scraper is a piece of software that helps you automate the tedious process of collecting useful data from third-party websites. Usually, this procedure involves making a request to a specific web page, reading the HTML code, and breaking down that code to gather some data.
Why should anyone scrape data?
Let's say you want to create a price comparison platform. You need the prices of several items from a couple of online shops. A web scraping tool can help you manage this in a couple of minutes.
Maybe you're trying to get some new leads for your company or even get the most favorable flight or hotel prices. While we were crawling the web, researching for this article we stumbled upon Brisk Voyage.
Brisk Voyage is a web application that helps its users find cheap, last-minute weekend trips. Using some sort of web scraping technology, they manage to constantly check flight and hotel prices. When the web scraper finds a trip that’s a low-priced outlier, the user receives an email with the booking instructions.
What are web scrapers used for?
Developers are using web scrapers for all kinds of data fetching but the most used cases are the following:
- Market analysis
- Price comparison
- Lead generation
- Academic research
- Collection training and testing datasets for Machine Learning
What are the challenges of Web Scraping with JavaScript & Node.Js?
You know those little tick boxes that make you admit you're not a robot? Oh well, they don't always succeed in keeping the bots away.
But most of the time they do, and when search engines find out you're trying to scrape their website without permission, they restrict your access.
Another obstacle web scrapers face is represented by the changes in a website's structure. One small change in the website's structure can make us waste a lot of time. Web scraping tools require frequent updates to adapt and get the job done.
One other challenge web scrapers face is called geo-blocking. Based on your physical location, a website can completely ban your access if requests come from untrustworthy regions.
To combat these challenges and help you focus on building your product we created WebScrapingAPI. It’s an easy-to-use, enterprise-grade scaled API that helps you collect and manage HTML data. We’re obsessed with speed, we use a global rotating proxy network and we have more than 10.000 clients already using our services. If you feel like you don’t have the time to build the web scraper from scratch, you can give WebScrapingAPI a try by using the free tier.
APIs: The easy way for web scraping
Most web applications supply an API that allows users to get access to their data in a predetermined, organized way. The user will make a request to a specific endpoint and the application responds with all the data the user specifically asked for. More often than not, the data will already be formatted as a JSON object.
When using an Application Programming Interface you normally don't have to worry about the previously presented obstacles. Be that as it may, APIs can also receive updates. In this situation, the user has to always keep an eye on the API he's using and update the code accordingly to not lose its functionality.
Furthermore, the documentation of an API matters a lot. If an API functionality it's not clearly documented the user finds itself wasting a lot of time.
Understanding the Web
A good understanding of the Internet requires a lot of knowledge. Let’s go through a brief introduction to all the terms you need to better understand web scraping.
HTTP or HyperText Transfer Protocol is the foundation of any data exchange on the web. As the name suggests, HTTP is a client-server convention. An HTTP client like a web browser, opens a connection to an HTTP server and sends a message, like: "Hey! What's up? Do you mind passing me those images?". The server typically offers a response, as the HTML code, and closes the connection.
Let's say you need to visit Google. If you type the address in the web browser and hit enter, the HTTP client (the browser) will send the following message to the server:
GET / HTTP/1.1
Host: google.com
Accept: text/html,application/xhtml+xml,application/xml;q=0.9,image/web\p,*/*;q=0.8
Accept-Encoding: gzip, deflate, sdch, br
Connection: keep-aliveUser-Agent: Mozilla/5.0 (Macintosh; Intel Mac OS X 10_11_6) AppleWebKit\/537.36 (KHTML, like Gecko) Chrome/56.0.2924.87 Safari/537.36
The first line of the message contains the request method (GET), the path we made the request to (in our case is just '/' because we only accessed www.google.com), the version of the HTTP protocol, and multiple headers, like Connection or User-Agent.
Let's talk about the most important header fields for the process:
- Host: The domain name of the server you accessed after you typed the address in the web browser and hit enter.
- User-Agent: Here we can see details regarding the client that made the request. I use a MacBook, as you can see from the __(Macintosh; Intel Mac OS X 10_11_6)__ part, and Chrome as the web browser __(Chrome/56.0.2924.87)__.
- Accept: By using this header, the client constrains the server to only send him some type of responses, like application/JSON or text/plain.
- Referrer: This header field contains the address of the page making the request. Websites use this header to change their content based on where the user comes from.
A server response can look like this:
HTTP/1.1 200 OK
Server: nginx/1.4.6 (Ubuntu) Content-Type: text/html; charset=utf-8
<!DOCTYPE html>
<html>
<head>
<title>Title of the document</title>
</head>
<body>The content of the document</body>
</html>
As you can see, on the first line there's the HTTP response code: **200 OK. This means that the scraping action was successful.
Now, if we would have sent the request using a web browser, it would have parsed the HTML code, obtained all the other assets like CSS, JavaScript files, images, and rendered the final version of the web page. In the steps below, we are going to try to automate this process.
Understanding Web Scraping with Node.Js
JavaScript was initially created to help its users add dynamic content to websites. In the beginning, it couldn't interact directly with a computer or its data. When you access a website, the JavaScript is read by the browser and changed to a couple of lines of code that the computer can process.
Introducing Node.Js, the tool that helps Javascript run not only client-side but also server-side. Node.Js can be defined as a free, open-source JavaScript for server-side programming. It helps its users build and run network applications quickly.
const http = require('http');
const port = 8000;
const server = http.createServer((req, res) => {
  res.statusCode = 200;
  res.setHeader('Content-Type', 'text/plain');
  res.end('Hello world!');
});
server.listen(port, () => {
  console.log(`Server running on port 8000.`);
});
If you don't have Node.Js installed, check the next step for the following instructions. Else create a new index.js file and run it by typing in a terminal node index.js, open up a browser and navigate to localhost:8000. You should see the following string: "Hello world!".
Required tools
Chrome - Please follow the installation guide here.
- VSCode - You can download it from this page and follow the instructions to install it on your device.
- Node.Js - Before starting using Axios, Cheerio, or Puppeteer, we need to install Node.Js and the Node Package Manager. The easiest way to install Node.Js and NPM is to get one of the installers from the Node.Js official source and run it.
After the installation is done, you can verify if Node.Js is installed by running node -v and npm -v in a terminal window. The version should be higher than v14.15.5. If you're having issues with this process, there's an alternative way of installing Node.Js.
Now, let's create a new NPM project. Create a new folder for the project and run npm init -y. Now let's get to installing the dependencies.
- Axios - a JavaScript library used to make HTTP requests from Node.Js. Run npm install axios in the newly created folder.
- Cheerio - an open-source library that helps us to extract useful information by parsing markup and providing an API for manipulating the resulting data. To use Cheerio you can select tags of an HTML document by making use of selectors. A selector looks like this: $("div"). This specific selector helps us pick all <div> elements on a page.
To install Cheerio, please run npm install cheerio in the projects' folder.
- Puppeteer - a Node.Js library that used to get control of Chrome or Chromium by providing a high-level API.
To use Puppeteer you have to install it using a similar command: npm install puppeteer. Note that when you install this package, it will also install a recent version of Chromium that is guaranteed to be compatible with your version of Puppeteer.
Data source inspection
First, you need to access the website you want to scrape using Chrome or any other web browser. To successfully scrape the data you need, you have to understand the website's structure.
Targeted website inspection
Once you managed to access the website, use it just as a normal user would do. If you accessed the /r/dundermifflin subreddit, you can check out the posts on the main page by clicking on them, checking out the commentaries, and the upvotes, and even sorting the posts by the number of votes during a specific timeframe.

As you can see, the website contains a list of posts, and each post has some upvotes and some comments.
You can understand a lot of the data of a website just by looking at its URL. In this case, https://www.old.reddit.com/r/DunderMifflin represents the base URL, the path that gets us to the "The Office" Reddit community. As you are starting to sort the posts by the number of votes, you can see that the base URL is changing to https://www.old.reddit.com/r/DunderMifflin/top/?t=year.
The query parameters are extensions of the URL that are used to help define specific content or actions based on the data being passed. In our case "?t=year" represents the time frame selected for which we will want to see the most upvoted posts.
As long as you're still on this specific subreddit, the base URL will stay the same. The only things that will change are the query parameters. We can look at them as the filters applied to the database to retrieve the data that we want. You can switch the timeframe to only see the top upvoted posts in the last month or week just by changing the URL.
Inspection using developer tools
In the following steps, you are going to learn more about how the information is organized on the page. You'll need to do this to have a better understanding of what can we actually scrape from our source.
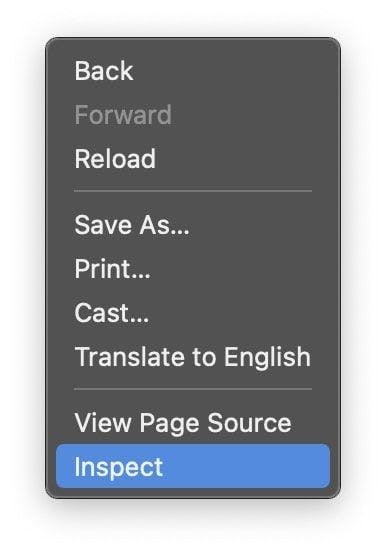
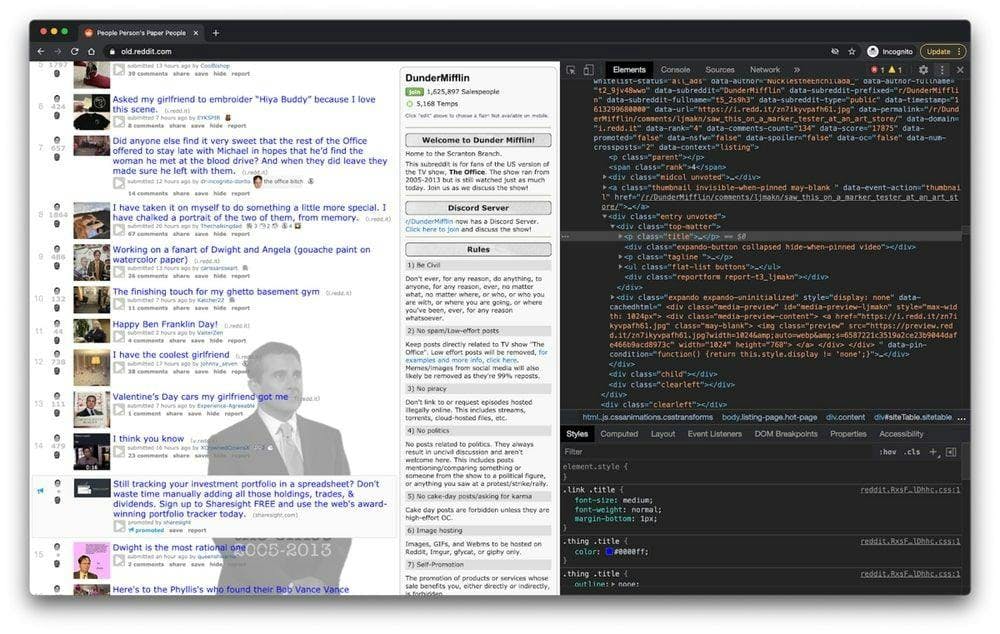
The developer tools help you interactively explore the website's Document Object Model (DOM). We are going to use the developer tools in Chrome but you can use any web browser you're comfortable with. In Chrome, you can open it by right-clicking anywhere on the page and selecting the "Inspect" option.

In the new menu that appeared on the screen, please select the "Elements" tab. This will present the interactive HTML structure of the website.

You can interact with the website by editing its structure, expanding and collapsing elements, or even deleting them. Note that these changes will only be visible to you.
Regular expressions and their role
Regular expressions, also known as RegEx, help you create rules that allow you to find and manage different strings. If you ever need to parse large amounts of information, mastering the world of regular expressions can save you a lot of time.
When you first start using regex, it seems to be a little too complicated, but the truth is they're pretty easy to use. Let's take the following example: \d. By using this expression, you can easily grab any digit from 0 to 9. Of course, there are a lot more complex ones, like: ^(\(\d{3}\)|^\d{3}[.-]?)?\d{3}[.-]?\d{4}$. This matches a phone number, with or without parentheses around the area code, or with or without dots to separate the numbers.
As you can see regular expressions are pretty easy to use and can be very powerful if you spend enough time mastering them.
Understanding Cheerio.js
After you've successfully installed all the previously presented dependencies and inspected the DOM using the developer tools, you can get to the actual scraping.
One thing that you should keep in mind is that if the page you are trying to scrape is a SPA (Single Page Application), Cheerio might not be the best solution. The reason is that Cheerio can't really think as a web browser. This is why in the following steps we are going to use Puppeteer. But until then, let's find out how powerful Cheerio is.
To test Cheerio's functionality, let's try to collect all the post titles on the previously presented subreddit: /r/dundermifflin.
Let's create a new file called index.js and type or just copy the following lines:
const axios = require("axios");
const cheerio = require("cheerio");
const fetchTitles = async () => {
	try {
		const response = await axios.get('https://old.reddit.com/r/DunderMifflin/');
                const html = response.data;
		const $ = cheerio.load(html);
		const titles = [];
		$('div > p.title > a').each((_idx, el) => {
			const title = $(el).text()
			titles.push(title)
		});
		return titles;
	} catch (error) {
		throw error;
	}};
fetchTitles().then((titles) => console.log(titles));
To better understand the code written above, we’re going to explain what the asynchronous function fetchTitles() does:
First, we make a GET request to the old Reddit website using the Axios library. The result of that request is then loaded by Cheerio at line 10. Using the developer tools, we've found out the elements containing the desired information are a couple of anchor tags. To be sure that we only select the anchor tags that contain the post’s title, we’re going to also select their parents by using the following selector: $('div > p.title > a')
To get each title individually and not just a big chunk of letters that make no sense, we have to loop through each post using the each() function. Finally, calling text() on each item will return me the title of that specific post.
To run it, just type node index.js in the terminal and hit enter. You should see an array containing all the titles of the posts.
DOM for NodeJS
As the DOM of a webpage is not available directly to Node.Js, we can use JSDOM. As per its documentation, JSDOM is a pure-JavaScript implementation of many web standards, notably the WHATWG DOM and HTML Standards, for use with Node.Js.
In other words, using JSDOM, we can create a DOM and manipulate it utilizing the same methods we would use for manipulating the web browser one.
JSDOM makes it possible for you to interact with a website you need to crawl. If you are familiar with manipulating the web browser DOM, understanding JSDOM functionality will not require much effort.
To better understand how JSDOM works, let's install it, create a new index.js file, and type or copy the following code:
const { JSDOM } = require('jsdom')
const { document } = new JSDOM(
  '<h1 class="string">Dunder mifflin, the people person\'s paper people!</h2>'
).window
const string = document.querySelector('.string')
console.log(string.innerHTML)
string.textContent = 'Hello world'
console.log(string.innerHTML)
As you can see, JSDOM creates a new Document Object Model that can be manipulated using the same method we use to manipulate the browser DOM. In line 3 a new h1 element is created in the DOM. Using the class attributed to the heading we select the element at line 7 and change its content in line 10. You can see the difference by printing out the DOM element before and after the change.
To run it, open up a new terminal, type node index.js, and hit enter.
Of course, you can do a lot more complex actions using JSDOM, like opening a web page and interacting with it, completing forms, and clicking buttons.
For what it's worth JSDOM it's a good option but Puppeteer gained a lot of traction in the past years.
Understanding Puppeteer: how to unravel JavaScript pages
Using Puppeteer, you can do most things you can manually do in a web browser, like completing a form, generating screenshots of pages, or automating UI testing.
Let's try to better understand its functionality by taking a screenshot of the /r/dundermifflin Reddit community. If you've previously installed the dependency, continue to the next step. If not, please run npm i puppeteer in the projects folder. Now, create a new index.js file and type or copy the following code:
const puppeteer = require('puppeteer')
async function takeScreenshot() {
	try {
		const URL = 'https://www.old.reddit.com/r/dundermifflin/'
		const browser = await puppeteer.launch()
		const page = await browser.newPage()
		await page.goto(URL)
		await page.pdf({ path: 'page.pdf' })
		await page.screenshot({ path: 'screenshot.png' })
		await browser.close()
	} catch (error) {
		console.error(error)
	}
}
takeScreenshot()
We created the takeScreenshot() asynchronous function.
As you can see, first an instance of the browser is started using the puppeteer.launch() command. Then we create a new page and by calling the goto() function using the URL as a parameter the page created earlier will be taken to that specific URL. The pdf() and screenshot() methods help us create a new PDF file and an image that contains the web page as a visual component.
Finally, the browser instance is closed in line 13. To run it, type node index.js in the terminal and hit enter. You should see two new files in the projects folder called page.pdf and screenshot.png.
Alternative to Puppeteer
If you don't feel comfortable using Puppeteer, you can always use an alternative like NightwatchJS, NightmareJS, or CasperJS.
Let's take Nightmare for example. Because it's using Electrons instead of Chromium, the bundle size is a little bit smaller. Nightmare can be installed by running the npm I nightmare command. We will try to replicate the previously successful process of taking a screenshot of the page using Nightmare instead of Puppeteer.
Let's create a new index.js file and type or copy the following code:
const Nightmare = require('nightmare')
const nightmare = new Nightmare()
return nightmare.goto('https://www.old.reddit.com/r/dundermifflin')
	.screenshot('./nightmare-screenshot.png')
 	.end()
	.then(() => {
		console.log('Done!')
	})
	.catch((err) => {
		console.error(err)
	})
As you can see in line 2 we create a new Nightmare instance, we point the browser at the web page we want to screenshot, take and save the screenshot at line 5 and end the Nightmare session at line 6.
To run it, type node index.js in the terminal and hit enter. You should see two new files nightmare-screenshot.png in the projects folder.
Main takeaways
If you're still here, congrats! You have all the information you need to build your own web scraper. Let's take a minute to summarise what you have learned so far:
- A web scraper is a piece of software that helps you automate the tedious process of collecting useful data from third-party websites.
- People are using web scrapers for all kinds of data fetching: market analysis, price comparison, or lead generation.
- HTTP Clients like web browsers help you make requests to a server and accept a response.
- JavaScript was initially created to help its users add dynamic content to websites. Node.Js is a tool that helps Javascript run not only client-side but also server-side.
- Cheerio is an open-source library that helps us to extract useful information by parsing HTML and providing an API for manipulating the resulting data.
- Puppeteer is a Node.Js library that is used to get control of Chrome or Chromium by providing a high-level API. Thanks to it, you can do most things you can manually do in a web browser, like completing a form, generating screenshots of pages, or automating.
- You can understand a lot of a website’s data just by looking at its URL.
- The developer tools help you interactively explore the website's Document Object Model.
- Regular expressions help you create rules that allow you to find and manage different strings.
- JSDOM is a tool that creates a new Document Object Model that can be manipulated using the same method you use to manipulate the browser DOM.
We hope the instructions were clear and you managed to get all the needed information for your next project. If you still feel like you don't want to do it yourself, you can always give WebScrapingAPI a try.
Thank you for sticking to the end!
News and updates
Stay up-to-date with the latest web scraping guides and news by subscribing to our newsletter.
We care about the protection of your data. Read our Privacy Policy.

Related articles

Explore the transformative power of web scraping in the finance sector. From product data to sentiment analysis, this guide offers insights into the various types of web data available for investment decisions.


Get started with WebScrapingAPI, the ultimate web scraping solution! Collect real-time data, bypass anti-bot systems, and enjoy professional support.


Learn what’s the best browser to bypass Cloudflare detection systems while web scraping with Selenium.
