Scraping with Cheerio: How to Easily Collect Data from Web Pages
Raluca Penciuc on Dec 21 2022
Long gone are the days when you manually collected and processed the data helping you kickstart your projects. Whether an e-commerce website or a lead generation algorithm, one thing is sure: the data-gathering process was tedious and time-consuming.
In this article, you will learn how Cheerio can come to your help with its extensive features of parsing markup languages, first with some trivial examples and then with a real-life use case.
Introduction to Cheerio
“But what is Cheerio?” you may ask yourself. Well, trying to clarify a common misconception, I will start with what Cheerio is not: a browser.
The confusion may start from the fact that Cheerio parses documents written in a markup language and then offers an API to help you manipulate the resulting data structure. But unlike a browser, Cheerio will not visually render the document, load CSS files or execute Javascript.
So basically what Cheerio does is to receive an HTML or XML input, parse the string and return the API. This makes it incredibly fast and easy to use, hence its popularity among Node.js developers.
Setting up the environment
Now, let’s see some hands-on examples of what Cheerio can do. First things first, you need to make sure your environment is all set up.
It goes without saying that you must have Node.js installed on your machine. If you don’t, simply follow the instructions from their official website, according to your operating system.
Make sure to download the Long Term Support version (LTS) and don’t forget about the Node.js Package Manager (NPM). You can run these commands to make sure the installation went okay:
node -v
npm -v
The output should look like this:

Now, regarding the IDE debate: for this tutorial, I will be using Visual Studio Code, as it is pretty flexible and easy to use, but you are welcome to use any IDE you prefer.
Just create a folder that will hold your little project and open a terminal. Run the following command to set up a Node.js project:
npm init -y
This will create a default version of the package.json file, which can be modified at any time.
Next step: I will install TypeScript along with the type definitions for Node.js:
npm install typescript @types/node -save-dev
I chose TypeScript in this tutorial for its optional static typing to JavaScript objects, which makes the code more bulletproof when it comes to type errors.
This is the same advantage that steadily increased its popularity among the JavaScript community, according to a recent CircleCI survey regarding the most popular programming languages.
To verify the correct installation of the previous command, you can run:
npx tsc --version
Now I will create the tsconfig.json configuration file at the root of the project directory, which should define the compiler options. If you want a better understanding of this file and its properties, the official TypeScript documentation got your back.
If not, then simply copy and paste the following:
{
    "compilerOptions": {
        "module": "commonjs",
        "esModuleInterop": true,
        "target": "es6",
        "moduleResolution": "node",
        "sourceMap": true,
        "outDir": "dist"
    },
    "lib": ["es2015"]
}
Almost done! Now you have to install Cheerio (obviously):
npm install cheerio
Last but not least, create the src directory which will hold the code files. And speaking of the code file, create and place the index.ts file in the src directory.
How does Cheerio work
Perfect! Now you can get it started.
For the moment I will illustrate some basic Cheerio features using a static HTML document. Simply copy and paste the content below into a new static.html file within your project:
<!DOCTYPE html>
<html lang="en">
<head>
    <title>Page Name - Static HTML Example</title>
</head>
<body>
    <div class="page-heading">
        <h1>Page Heading</h1>
    </div>
    <div class="page-container">
        <div class="page-content">
            <ul>
                <li>
                    <a href="#">Item 1</a>
                      <p class="price">$100</p>
                      <p class="stock">12</p>
                </li>
                <li>
                    <a href="#">Item 2</a>
                    <p class="price">$200</p>
                    <p class="stock">422</p>
                </li>
                <li>
                    <a href="#">Item 3</a>
                    <p class="price">$150</p>
                    <p class="stock">5</p>
                </li>
            </ul>
        </div>
    </div>
    <footer class="page-footer">
        <p>Last Updated: Friday, September 23, 2022</p>
    </footer>
</body>
</html>
Next, you have to serve the HTML file as input to Cheerio, which will then return the resulting API:
import fs from 'fs'
import * as cheerio from 'cheerio'

const staticHTML = fs.readFileSync('static.html')
const $ = cheerio.load(staticHTML)
If you receive an error at this step, make sure that the input file contains a valid HTML document, as from Cheerio version 1.0.0 this criterion is verified as well.
Now you can start experimenting with what Cheerio has to offer. The NPM package is well-known for its jQuery-like syntax and the use of CSS selectors to extract the nodes you are looking for. You can check out their official documentation to get a better idea.
Let’s say you want to extract the page title:
const title = $('title').text()
console.log("Static HTML page title:", title)
We should test this, right? You are using Typescript, so you have to compile the code, which will create the dist directory, and then execute the associated index.js file. For simplicity, I will define the following script in the package.json file:
"scripts": {
    "test": "npx tsc && node dist/index.js",
}
This way, all I have to do is to run:
npm run test
and the script will handle both steps that I just described.
Okay, but what if the selector matches more than one HTML element? Let’s try extracting the name and the stock value of the items presented in the unordered list:
const itemStocks = {}
$('li').each((index, element) => {
    const name = $(element).find('a').text()
    const stock = $(element).find('p.stock').text()
    itemStocks[name] = stock
})
console.log("All items stock:", itemStocks)
Now run the shortcut script again, and the output from your terminal should look like this:
Static HTML page title: Page Name - Static HTML Example
All items stock: { 'Item 1': '12', 'Item 2': '422', 'Item 3': '5' }
Use cases for Cheerio
So that was basically the tip of the iceberg. Cheerio is also capable of parsing XML documents, extracting the style of the HTML elements and even altering the nodes’ attributes.
But how can Cheerio help in a real use case?
Let’s say that we want to gather some data to train a Machine Learning model for a future bigger project. Usually, you would search Google for some training files and download them, or use the website’s API.
But what do you do when you can’t find some relevant files or the website you are looking at does not provide an API, has a rate-limiting over the data or does not offer the whole data that you are seeing on a page?
Well, this is where web scraping comes in handy. If you are curious about more practical use cases of web scraping, you can check out this well-written article from our blog.
Back to our sheep, for the sake of the example let’s consider that we are in this precise situation: wanting data, and data is nowhere to be found. Remember that Cheerio does not handle the HTML extraction nor the CSS loading or JS execution.
Thus, in our tutorial, I am using Puppeteer to navigate to the website, grab the HTML and save it to a file. Then I will repeat the process from the previous section.
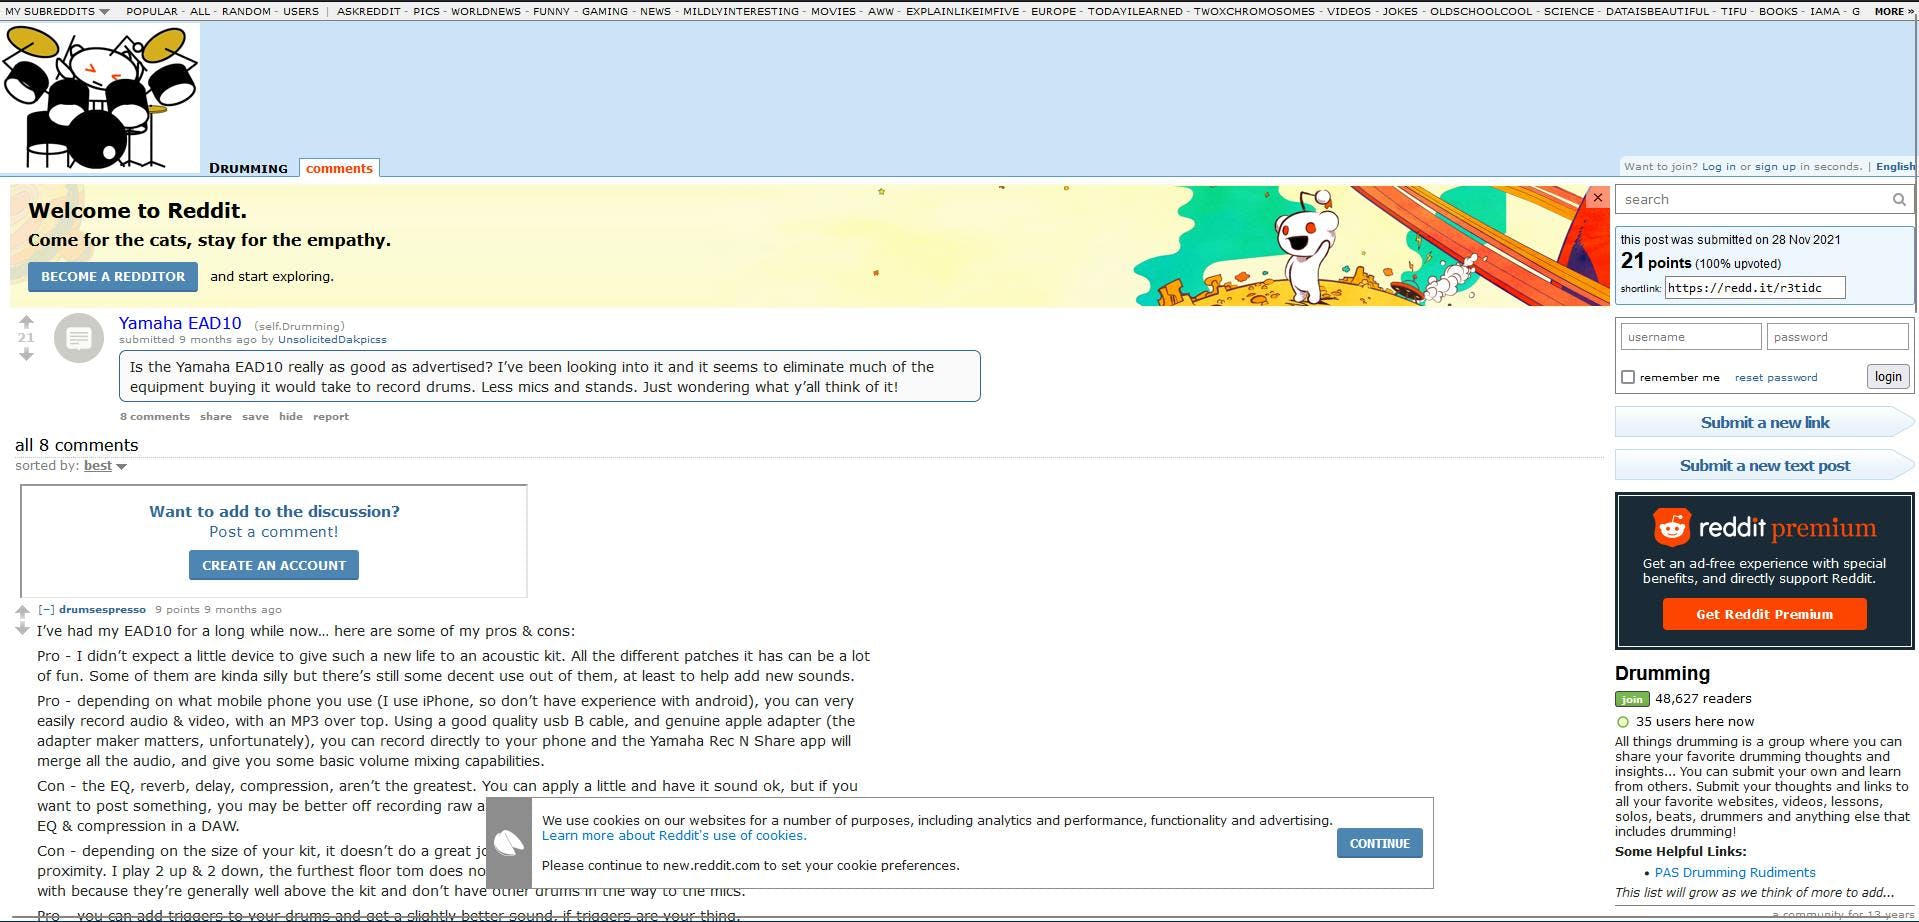
To be more specific, I want to gather some public opinions from Reddit on a popular drum module and centralise the data in a single file that will be further fed to a potential ML training model. What happens next can also vary: sentiment analysis, market research and the list can go on.

Request for the HTML
Let’s see how this use case will look put into code. First, you need to install the Puppeteer NPM package:
npm install puppeteer
I will also create a new file reddit.ts, to keep the project more organised, and define a new script in the package.json file:
"scripts": {
    "test": "npx tsc && node dist/index.js",
    "parse": "npx tsc && node dist/reddit.js"
},
To get the HTML document, I will define a function looking like this:
import fs from 'fs'
import puppeteer from 'puppeteer'
import * as cheerio from 'cheerio'

async function getContent(url: string): Promise<void> {

    // Open the browser and a new tab
    const browser = await puppeteer.launch()
    const page = await browser.newPage()

    // Navigate to the URL and write the content to file
    await page.goto(url)
    const pageContent = await page.content()
    fs.writeFileSync("reddit.html", pageContent)

    // Close the browser
    await browser.close()
    console.log("Got the HTML. Check the reddit.html file.")
}
To quickly test this, add an entry point in your code and call the function:
async function main() {


    const targetURL = 'https://old.reddit.com/r/Drumming/comments/r3tidc/yamaha_ead10/'
    await getContent(targetURL)
}

main()
    .then(() => {console.log("All done!")})
    .catch(e => {console.log("Unexpected error occurred:", e.message)})
The reddit.html file should appear in your project tree, which will contain the HTML document we want.
Where are my nodes?
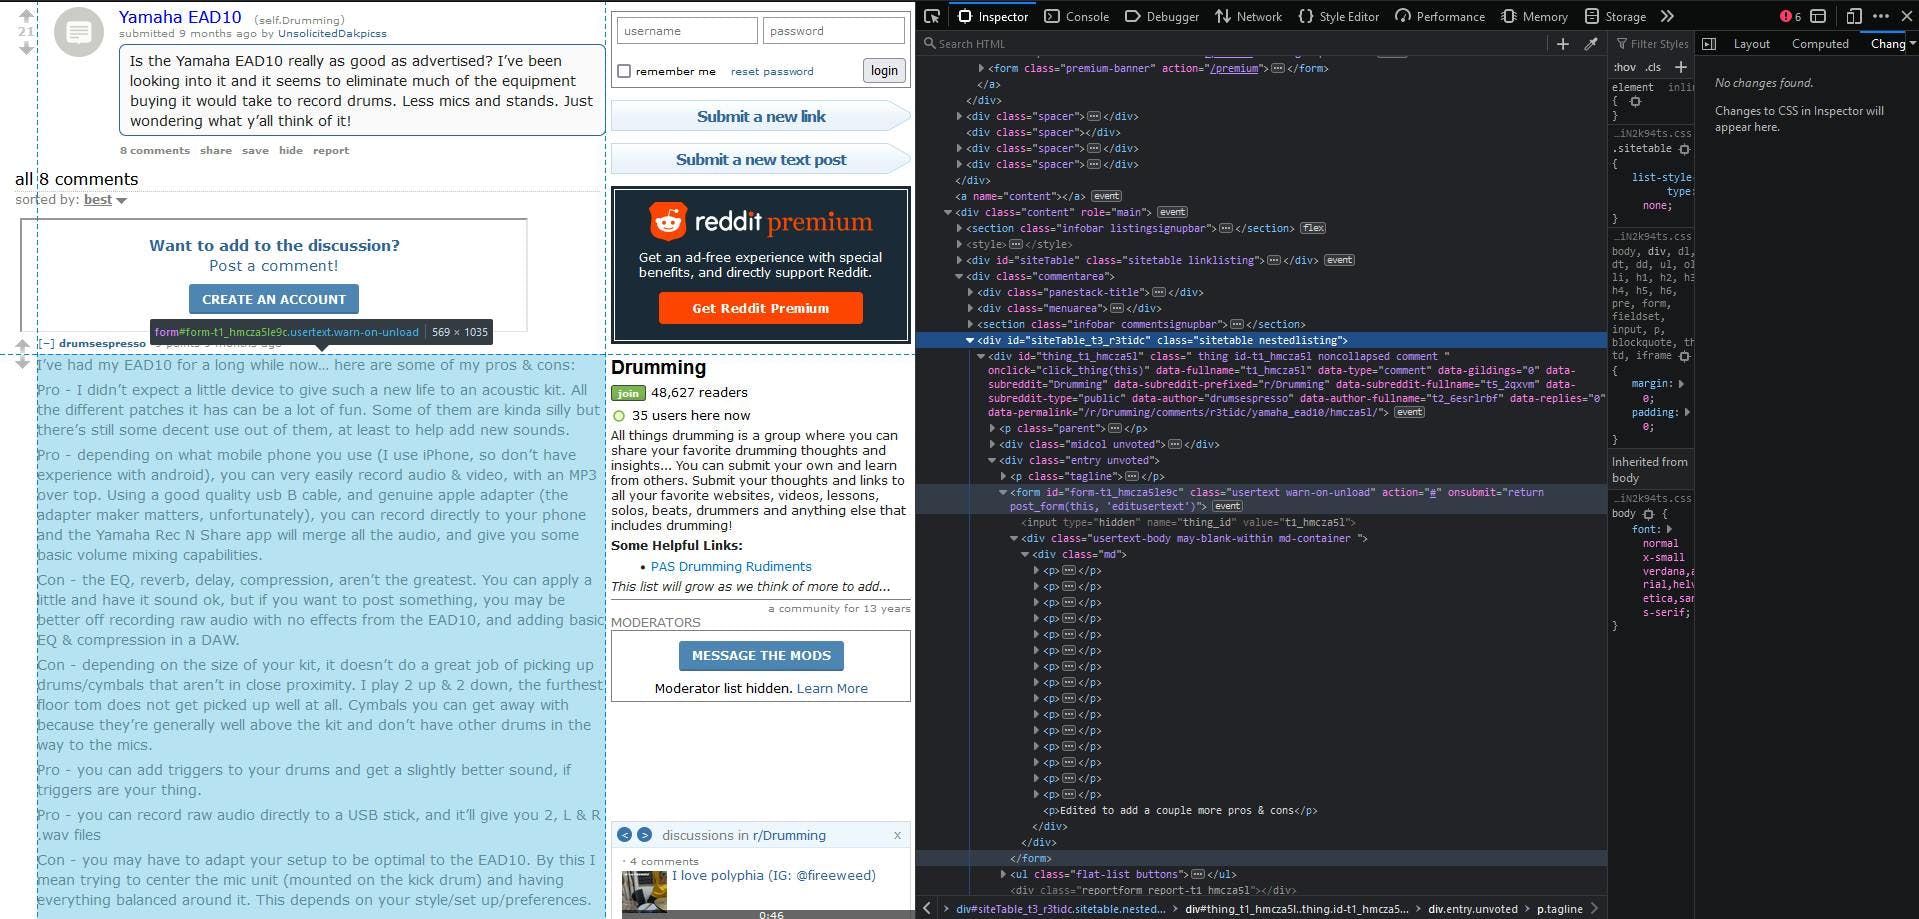
Now, a bit of a more challenging part: you have to identify the nodes that are of interest for our use case. Go back to your browser (the real one) and navigate to the target URL. Go with your mouse cursor over the comments section, right-click and then choose the “Inspect” option.
The Developer Tools tab will open, showing you the exact same HTML document you previously saved on your machine.

To extract only the comments, you have to identify the selectors unique to this section of the page. You can notice that the whole list of comments is within a div container with a sitetable nestedlisting class.
Going deeper, each individual comment has a form element as a parent, with the usertext warn-on-unload class. Then, at the bottom, you can see that every comment’s text is divided between multiple p elements.
Parsing and saving the data
Let’s see how this works in code:
function parseComments(): void {

    // Load the HTML document
    const staticHTML = fs.readFileSync('reddit.html')
    const $ = cheerio.load(staticHTML)

    // Get the comments section
    const commentsSection = $('div.sitetable.nestedlisting')

    // Iterate each comment
    const comments = []


    $(commentsSection).find('form.usertext.warn-on-unload').each((index, comment) => {
        let commentText = ""

          // Iterate each comment section and concatenate them
          $(comment).find('p').each((index, piece) => {
            commentText += $(piece).text() + '\n'
          })

          comments.push(commentText)
    })

    // Write the results to external file
    fs.writeFileSync("comments.json", JSON.stringify({comments}))
}
Alright, and now let’s update the entry point with the newly defined function and see how this code is working together:
async function main() {

    const targetURL = 'https://old.reddit.com/r/Drumming/comments/r3tidc/yamaha_ead10/'
    await getContent(targetURL)
    parseComments()
}

main()
    .then(() => {console.log("All done. Check the comments.csv file.")})
    .catch(e => {console.log("Unexpected error occurred:", e.message)})
Execute the code with the script defined before:
npm run parse
It will take around 5 to 10 seconds for the headless browser to open and navigate to our target URL. If you are more curious about it, you can add timestamps at the beginning and the end of each of our functions to really see how fast Cheerio is.
The comments.json file should be our final result:

This use case can be easily extended to parsing the number of upvotes and downvotes for every comment, or to get the comments’ nested replies. The possibilities are endless.
Takeaway
Thank you for making it to the end of this tutorial. I hope you grasped how indispensable Cheerio is to the process of data extraction and how to quickly integrate it into your next scraping project.
We are also using Cheerio in our product, WebScrapingAPI. If you ever find yourself tangled by the many challenges encountered in web scraping (IP blocks, bot detection, etc.), consider giving it a try.
News and updates
Stay up-to-date with the latest web scraping guides and news by subscribing to our newsletter.
We care about the protection of your data. Read our Privacy Policy.

Related articles

Get started with WebScrapingAPI, the ultimate web scraping solution! Collect real-time data, bypass anti-bot systems, and enjoy professional support.


Discover how to efficiently extract and organize data for web scraping and data analysis through data parsing, HTML parsing libraries, and schema.org meta data.


Discover 3 ways on how to download files with Puppeteer and build a web scraper that does exactly that.
