How to Scrape HTML Table in JavaScript
Mihai Maxim on Jan 31 2023

Knowing how to scrape HTML tables with javascript can be a crucial skill when dealing with tabular data displayed on the web. Websites often display important information, such as product details, prices, inventory levels, and financial data in tables. Being able to extract this information is extremely useful when gathering data for all kinds of analysis tasks. In this article, we'll go in-depth on HTML tables and build a simple yet powerful program to extract data from them and export it to a CSV or JSON file. We'll use Node.js and cheerio to make the process a breeze.
Understanding the structure of a HTML table
HTML tables are a powerful tool for marking up structured tabular data and displaying it in a way that is easy for users to read and understand. Tables are made up of data organized into rows and columns, and HTML provides several different elements for defining and structuring this data. A table must include at least the following elements: <table>, <tr> (table row), and <td> (table data). For added structure and semantic value, tables may also include the <th> (table header) element, as well as the <thead>, <tbody>, and <tfoot> elements.
Let’s explore the tags with the help of a little example.
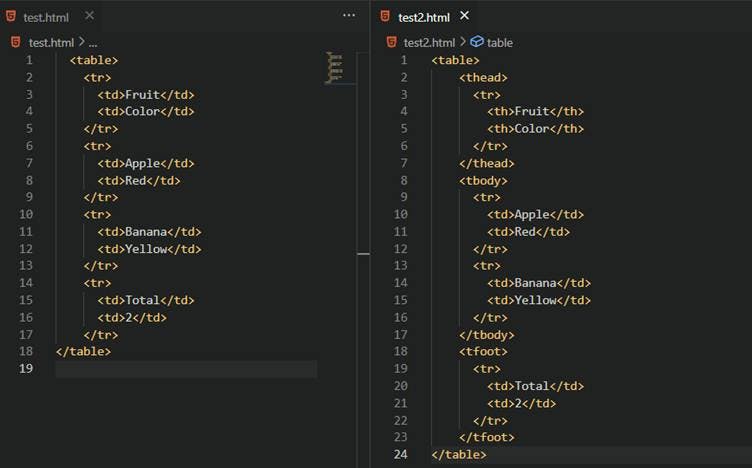
Notice how the second table uses a more specific syntax
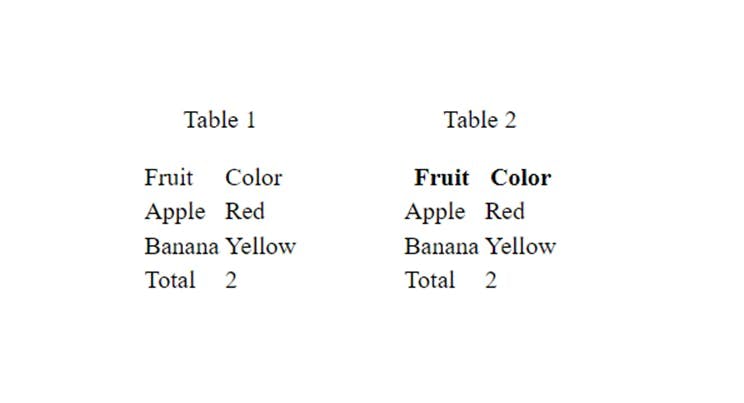
The <thead> tag will apply a bold font to the "Fruit" and "Color" cells in the second table. Other than that, you can see how both syntaxes achieve the same organization of the data.
When scraping tables from the web, it is important to be aware that you may encounter tables that are written with varying degrees of semantic specificity. In other words, some tables may include more detailed and descriptive HTML tags, while others may use a simpler and less descriptive syntax.
Scraping HTML Tables with Node.js and cheerio
Welcome to the fun part! We've learned about the structure and purpose of HTML tables, and now it's time to put that knowledge into action by doing something practical. Our target for this tutorial is the best-selling artists of all-time table found on https://chartmasters.org/best-selling-artists-of-all-time/. We'll start by setting up our work environment and installing the necessary libraries. Then, we'll explore our target website and come up with some selectors to extract the data found on the table. After that, we'll write the code to actually scrape the data and finally, we'll export it to different formats like CSV and JSON.
Setting up the work environment
Alright, let’s get started with our brand new project! Before you begin, make sure you have node.js installed. You can download it from https://nodejs.org/en/.
Now open your favorite code editor, open your project directory, and run (in the terminal):
npm init -y
This will initialize a new project and create a default package.json file.
{

  "name": "html_table_scraper", // the name of your project folder

  "version": "1.0.0",

  "description": "",

  "main": "index.js",

  "scripts": {

    "test": "echo \"Error: no test specified\" && exit 1"

  },

  "keywords": [],

  "author": "",

  "license": "ISC"

}
To keep things simple we will be importing our modules with “require”. But if you want to import modules using the “import” statement, add this to your package.json file:
 "type": "module",

 // this will enable you to use the import statement

 // ex: import * as cheerio from 'cheerio';
The “main”: “index.js” option specifies the name of the file that is the entry point of our program. With that being said, you can now create an empty index.js file.
We will be using the cheerio library to parse the HTML of our target website. You can install it with:
npm install cheerio
Now open the index.js file and include it as a module:
const cheerio = require('cheerio');The basic work environment is set. In the next chapter, we will explore the structure of the best-selling-artists-of-all-time table.
Testing the Target Site Using DevTools
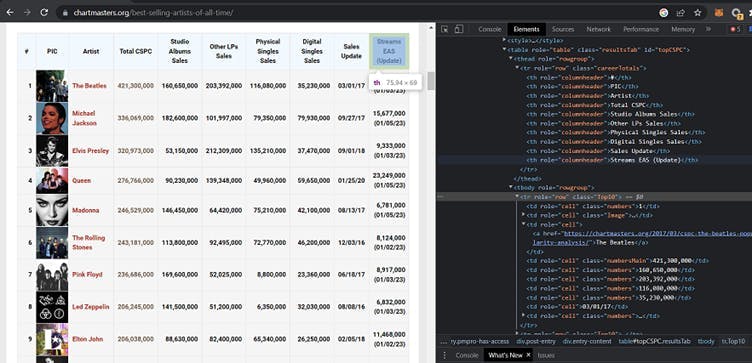
By inspecting the “Elements” tab of the Developer Tools, we can extract valuable information about the structure of the table:
The table is stored in a <thead>, <tbody> format.
All tabel elements are assigned descriptive id’s, classes and roles.
In the context of a browser, you have direct access to the HTML of a web page. This means you can use JavaScript functions like getElementsByTagName or querySelector to extract data from the HTML.
With this in mind, we can use the Developer Tools Console to test some selectors.
Let’s extract the header names using the role=”columnheader” attribute
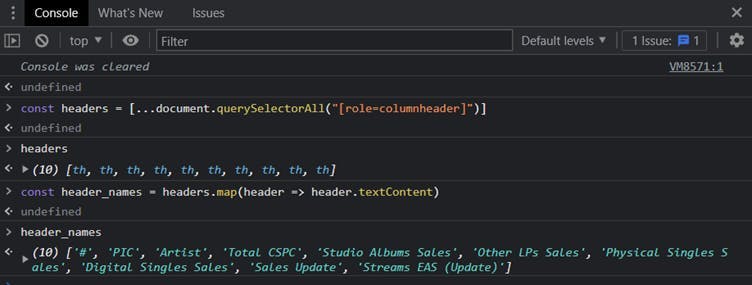
Now let’s extract the data from the first row using the role=”cell” and role=”row” attributes:
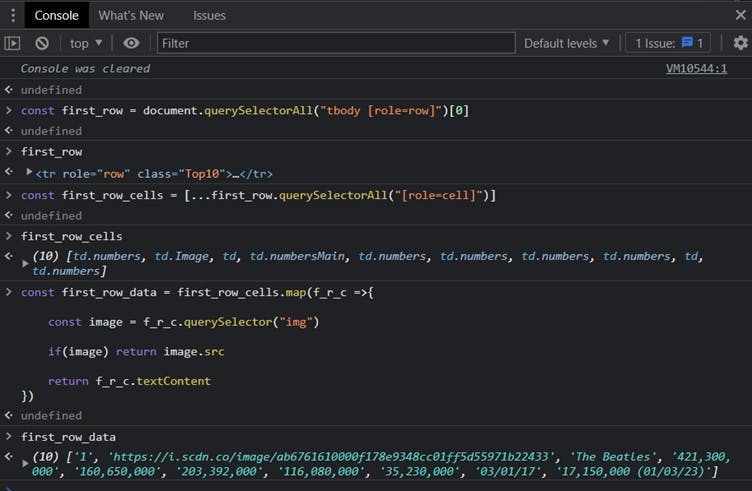
As you can see:
We can use “[role=columheader]” to select all the header elements.
We can use “tbody [role=row]” to select all the row elements.
For every row, we can use “[role=cell]” to select its cells.
One thing to note is that the PIC cell contains an image and we should write a special rule to extract its URL.
Implementing a HTML Table scraper
Now it's time to make things a little more advanced by using Node.js and cheerio.
To get the HTML of a website in a Node.js project, you’ll have to make a fetch request to the site. This returns the HTML as a string, which means you can't use JavaScript DOM functions to extract data. That's where cheerio comes in. Cheerio is a library that allows you to parse and manipulate the HTML string as if you were in the context of a browser. This means that you can use familiar CSS selectors to extract data from the HTML, just like you would in a browser.
It's also important to note that the HTML returned from a fetch request may be different than the HTML you see in the browser. This is because the browser runs JavaScript, which can modify the HTML that is displayed. In a fetch request, you’re just getting the raw HTML, without any JavaScript modifications.
Just for testing purposes, let’s make a fetch request to our target website and write the resulting HTML to a local file:
//index.js

const fs = require('fs');

(async () => {

    const response =  await fetch('https://chartmasters.org/best-selling-artists-of-all-time/');

    const raw_html = await response.text();

    fs.writeFileSync('raw-best-selling-artists-of-all-time.html', raw_html);

})();

// it will write the raw html to raw-best-selling-artists-of-all-time.html

// try it with other websites: https://randomwordgenerator.com/
You can run it with:
node index.js
And you’ll get:

The table structure remains the same. This means that the selectors we found in the previous chapter are still relevant.
Ok, now let’s continue with the actual code:
After you make the fetch request to https://chartmasters.org/best-selling-artists-of-all-time/, you’ll have to load the raw html into cheerio:
const cheerio = require('cheerio');

(async () => {

    const response =  await fetch('https://chartmasters.org/best-selling-artists-of-all-time/');

    const raw_html = await response.text();

    const $ = cheerio.load(raw_html);

})();
With cheerio loaded, let’s see how we can extract the headers:
    const headers = $("[role=columnheader]")

    const header_names = []

    headers.each((index, el) => {

        header_names.push($(el).text())

    })
//header_names
[
'#',
'PIC',
'Artist',
'Total CSPC',
'Studio Albums Sales',
'Other LPs Sales',
'Physical Singles Sales',
'Digital Singles Sales',
'Sales Update',
'Streams EAS (Update)'
]
And the first row:
    const first_row = $("tbody [role=row]")[0]

    const first_row_cells = $(first_row).find('[role=cell]')

    const first_row_data = []

    first_row_cells.each((index, f_r_c) => {

        const image = $(f_r_c).find('img').attr('src')

        if(image) {

            first_row_data.push(image)

        }

        else {

            first_row_data.push($(f_r_c).text())

        }

    })
//first_row_data
[
'1',
'https://i.scdn.co/image/ab6761610000f178e9348cc01ff5d55971b22433',
'The Beatles',
'421,300,000',
'160,650,000',
'203,392,000',
'116,080,000',
'35,230,000',
'03/01/17',
'17,150,000 (01/03/23)'
]
Remember when we scraped the HTML table with JavaScript in the Browser Developer Tools console? At this point, we replicated the same functionality we implemented there, but in the context of the Node.js project. You can review the last chapter and observe the many similarities between the two implementations.
Moving forward, let’s rewrite the code to scrape all the rows:
    const rows = $("tbody [role=row]")

    const rows_data = []

    rows.each((index, row) => {

        const row_cell_data = []

        const cells = $(row).find('[role=cell]')

        cells.each((index, cell) => {

            const image = $(cell).find('img').attr('src')

            if(image) {

                row_cell_data.push(image)

            }

            else {

                row_cell_data.push($(cell).text())

            }

        })
rows_data.push(row_cell_data)
})
//rows_data
[
[
'1',
'https://i.scdn.co/image/ab6761610000f178e9348cc01ff5d55971b22433',
'The Beatles',
'421,300,000',
'160,650,000',
'203,392,000',
'116,080,000',
'35,230,000',
'03/01/17',
'17,150,000 (01/03/23)'
],
[
'2',
'https://i.scdn.co/image/ab6761610000f178a2a0b9e3448c1e702de9dc90',
'Michael Jackson',
'336,084,000',
'182,600,000',
'101,997,000',
'79,350,000',
'79,930,000',
'09/27/17',
'15,692,000 (01/06/23)'
],
...
]
Now that we obtained the data, let’s see how we can export it.
Exporting the data
After you have successfully obtained the data you wish to scrape, it is important to consider how you want to store the information. The most popular options are .json and .csv. Choose the format best meets your specific needs and requirements.
Exporting the data to json
If you want to export the data to .json, you should first bundle the data in a JavaScript object that resembles the .json format.
We have an array of header names (header_names) and another array (rows_data, an array of arrays) that contains the rows data. The .json format stores information in key-value pairs. We need to bundle our data in such a way that it follows that rule:
[ // this is what we need to obtain

  {

    '#': '1',

    PIC: 'https://i.scdn.co/image/ab6761610000f178e9348cc01ff5d55971b22433',

    Artist: 'The Beatles',

    'Total CSPC': '421,300,000',

    'Studio Albums Sales': '160,650,000',

    'Other LPs Sales': '203,392,000',

    'Physical Singles Sales': '116,080,000',

    'Digital Singles Sales': '35,230,000',

    'Sales Update': '03/01/17',

    'Streams EAS (Update)': '17,150,000 (01/03/23)'

  },

  {

    '#': '2',

    PIC: 'https://i.scdn.co/image/ab6761610000f178a2a0b9e3448c1e702de9dc90',

    Artist: 'Michael Jackson',

    'Total CSPC': '336,084,000',

    'Studio Albums Sales': '182,600,000',

    'Other LPs Sales': '101,997,000',

    'Physical Singles Sales': '79,350,000',

    'Digital Singles Sales': '79,930,000',

    'Sales Update': '09/27/17',

    'Streams EAS (Update)': '15,692,000 (01/06/23)'

  }

  ...

]
Here is how you can achieve this:
     // go through each row

 const table_data = rows_data.map(row => {

        // create a new object

        const obj = {};

        // forEach element in header_names

        header_names.forEach((header_name, i) => {

          // add a key-value pair to the object where the key is the current header name and the value is the value at the same index in the row

          obj[header_name] = row[i];

        });

        // return the object

        return obj;

 });
Now you can use the JSON.stringify() function to convert the JavaScript object to a .json string and then write it to a file.
 const fs = require('fs');

 const table_data_json_string = JSON.stringify(table_data, null, 2)

 fs.writeFile('table_data.json', table_data_json_string, (err) => {

if (err) throw err;

console.log('The file has been saved as table_data.json!');

 })
Exporting the data to csv
The .csv format stands for “comma separated values”. If you want to save your table to .csv, you’ll need to write it in a format similar to this:
id,name,age // the table headers followed by the rows

1,Alice,20

2,Bob,25

3,Charlie,30
Our table data consists of an array of header names (header_names) and another array (rows_data, an array of arrays) that contains the rows data. Here is how you can write this data to a .csv file:
    let csv_string = header_names.join(',') + '\n'; // add the headers

    // forEach row in rows_data

    rows_data.forEach(row => {

      // add the row to the CSV string

      csv_string += row.join(',') + '\n';

    });


    // write the string to a file

    fs.writeFile('table_data.csv', csv_string, (err) => {

      if (err) throw err;

      console.log('The file has been saved as table_data.csv!');

    });
Avoid getting blocked
Have you ever run into the issue of trying to scrape a website and realizing that the page you're trying to extract information from isn't fully loading? This can be frustrating, especially if you know that the website is using JavaScript to generate its content. We don't have the ability to execute JavaScript like a regular browser does, which can lead to incomplete data or even getting banned from the website for making too many requests in a short period of time.
One solution to this problem is WebScrapingApi. With our service, you can simply make requests to our API and it will handle all the complex tasks for you. It will execute JavaScript, rotate proxies, and even handle CAPTCHAs.
Here is how you can make a simple fetch request to a <target_url> and write the response to a file:
const fs = require('fs');

(async () => {

    const result = await fetch('https://api.webscrapingapi.com/v1?' + new URLSearchParams({

        api_key: '<api_key>',

        url: '<target_url>',

        render_js: 1,

        proxy_type: 'residential',

    }))


    const html = await result.text();

    fs.writeFileSync('wsa_test.html', html);

})();
You can get a free API_KEY by creating a new account at https://www.webscrapingapi.com/
By specifying the render_js=1 parameter, you will enable WebScrapingAPI's capability of accessing the targeted web page using a headless browser which allows JavaScript page elements to render before delivering the final scraping result back to you.
Check out https://docs.webscrapingapi.com/webscrapingapi/advanced-api-features/proxies to discover the capabilities of our rotating proxies.
Conclusion
In this article, we learned about the power of web scraping HTML tables with JavaScript and how it can help us extract valuable data from websites. We explored the structure of HTML tables and learned how to use the cheerio library in combination with Node.js to easily scrape data from them. We also looked at different ways to export the data, including CSV and JSON formats. By following the steps outlined in this article, you should now have a solid foundation for scraping HTML tables on any website.
Whether you're a seasoned pro or just getting started with your first scraping project, WebScrapingAPI's is here to help you every step of the way. Our team is always happy to answer any questions you might have and offer guidance on your projects. So if you ever feel stuck or just need a helping hand, don't hesitate to reach out to us.
News and updates
Stay up-to-date with the latest web scraping guides and news by subscribing to our newsletter.
We care about the protection of your data. Read our Privacy Policy.

Related articles
Learn how to scrape dynamic JavaScript-rendered websites using Scrapy and Splash. From installation to writing a spider, handling pagination, and managing Splash responses, this comprehensive guide offers step-by-step instructions for beginners and experts alike.


Discover how to efficiently extract and organize data for web scraping and data analysis through data parsing, HTML parsing libraries, and schema.org meta data.


Learn how to use proxies with Axios & Node.js for efficient web scraping. Tips, code samples & the benefits of using WebScrapingAPI included.
